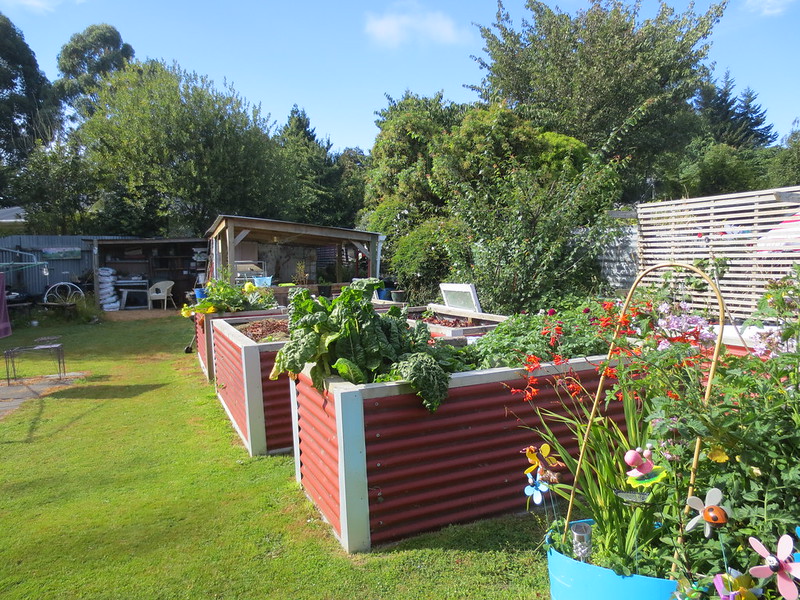
If you want your seeds to grow strongly and healthily into veggies or flowers in the garden, metal raised garden beds are great options to add optimal protection to your plants from pets!
To get it done, follow the ten easy instructions below to get a DIY raised garden box with corrugated metal effectively. Let’s dive into it now!
How To Make Metal Raised Garden Beds? 10 Detailed Steps
Metal raised garden beds can solve a variety of garden issues, especially if you have poor soil and limited area in your yard. As you can easily find plenty of raised box kits in the market these days, building your DIY garden bed becomes much easier! Here are ten steps you need to follow:
Step 1: Prepare the Tools
Here is the list of necessary materials and tools to build a metal raised garden bed:
- Corrugated metal (old or new are possible)
- 2 x 6 x 10-feet and 2 x 6 x 8-feet cedar wood boards for making the box frame
- 4 x 4-inch x 10-feet cedar wood post
- Measuring tape; pencil
- Saw; hammer; drill
- Screws (deck and self-taping); drip tube.
- Soil
Step 2: Determine Box Size
Determining the size of the box frame is the second step in the process of building your metal raised garden beds. Specifically, the overall length and width depending on how large your area is and how much wood you need. Our frame size is commonly 4’wide x 8′ long x 21″ tall.
Step 3: Create the Bottom Frame
To begin with, you need to cut the 2 x 6 cedar wood boards in half lengthwise by table saw. Once the lumber is ripped down, cut two sides at 8-feet in length and two ends at 4-feet long. Then, use the miter saw to make the ends board at 45 degrees.
Layout four cut pieces into a rectangle and secure each corner together with deck screws until you have a sturdy bottom frame.
Step 4: Cut and Notch the Corner Posts
Moving to the next step, this is time to create four corner posts for your metal raised garden beds. In detail, cut the 4 x 4 cedar posts into separated pieces at 18 ½ inches long.
Hack the notches on the post to make the raised bed look cleaner and stable. Moreover, it is easier to cut the notches where the top rails fit with the posts if you use a 2 x 6 cedar board as a reference template. After the cut, the notch’s dimension should be smaller than the 2 x 6 board outline at 1 ½ inches and 5 ½ inches.
After that, using a miter saw, hammer, and chisel to cut along the outline drawn block and finish the square top notches in a smooth shape. Then, follow the same pattern to cut out the notches for the lower bottom rails. Once both sides of posts are notched, your cedar posts will be left as follows:
Step 5: Attach The Corner Posts To The Bottom Frame
Once the corner posts are cut and notched, jump on the step that assists you in attaching them into the bottom frame.
Firstly, put it upright on the bottom frame’s corner so that the notches fit firmly over the frame. You can use the square ruler for better results. Then, secure the posts to the frame until four sides of the box are attached.
Next, adding the side rails to the frame box. To get it done, position two 8-feet long side posts and two 4-feet end rails into those notches. Then secure them to the posts with some screws.
Step 6: Install The Corrugated Metal
Once the frame is built, it is time for you to install corrugated metal panels on each side. To be more specific, insert the two ends piece with 4-feet length and two long sides at 8-feet long into the wood frame.
To make it more supported, attach plenty of self-tapping screws into the top and bottom frame.
Step 7: Insert The Corner Blocks
This is an additional step to make the metal sheets perfectly line up straight on each corner. In detail, screw a total of eight wood strips on both sides of each corner edge.
Step 8: Add The Top Cap And Drip Tube
Your frame box will look nicer if the top cap is added before filling with dirt. Screw the top cap at 10-feet length (cut from 2 x 6 cedar boards) into all sides of the frame box. Following that, make sure to pull the drip tube to the garden box to avoid flooding your veggies.
Step 9: Fill Soil
Now, you can move your plants into their chosen place and start filling the box with garden dirt. We advised you to use the packaged soil mixture for better growing results.
If you use an old corrugated metal with a few minor holes, it is important to cover those spots by landscaping fabric before filling it with dirt.
Step 10: Add Plants & Enjoy
The final step is sowing the seeds and enjoying the new DIY metal raised garden beds in your home garden. More importantly, do not forget to adjust the amount of soil while you are growing the plants.
Conclusion
After reading our post, you now know how to make metal raised garden beds, right? Indeed, a metal-raised garden box is not only an easy-to-made item but also a wonderful protective barrier to your plants.
We hope you can successfully apply the ten steps listed above to build your garden box and enjoy the fresh vegetables every day in your backyard!
Thank you for your reading, and see you in our next article!

